
Starting from this post, I will share my learning and hacking experience on Nvidia Jetson TX1 dev board. This post discusses the installation issue of JetPack [4] and post-installation configurations for TX1. We assume users follow the JetPack 3.3 installation guide to setup the TX1.
1. DHCP Issue
One of the two possible configurations to setup JetPack on TX1 is to use DHCP, where the host machine is the DHCP server and the TX1 is the client. This connecting model is needed when there is no switch available and only the host machine has the Internet connection. In my case, the host machine connects with the Internet with Wifi and the Eithernet port is used to connect with TX1. Everything looks fine until TX1 tries to get an IP address from the host. “can’t determine the target IP” will be returned from the terminal and all the following JetPack installation on the TX1 will fail (although we have already flashed the L4T to the TX1 successfully). Turns out this is a known bug due to the argument changes within nmcli between Ubuntu 14.04 and 16.04 [1]. A detailed workaround is also provided there:
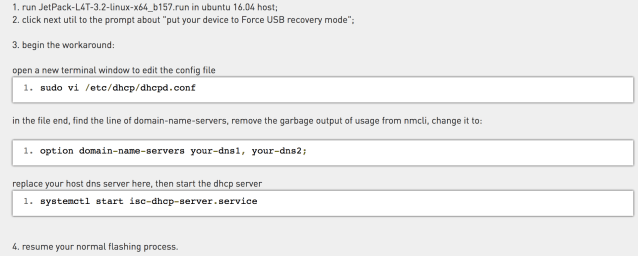
Although the issue was reported on JetPack 3.2 for TX2, JetPack 3.3 still has this issue on TX1. JetPack 4.0 hopefully would fix this configuration bug.
2. Mount SD Card
TX1 comes with 16G eMMC storage. After full installation of JetPack, only 5.3G is left. As a result, we need extra storage to do something useful, e.g., compiling the Linux kernel on TX1. Again, the devtalk forum has a good discussion [2]. I used gparted to partition and format a 64G SD card with EXT4. Then find the UUID using blkid. Once we have the UUID for the new partition, we can put it into /etc/fstab for auto mounting.

3. Setup An Account
After full deployment of JetPack on TX1, we have 2 accounts ready for use “ubuntu/ubuntu” and “nvidia/nvidia”. We can use the later one to do CUDA development. However, to support multiple users on the board, we need to create new users using adduser. The first thing after logging as a new user on TX1 might be “nvcc not found” – Duh! Since “nvidia” has CUDA environment setup already, let’s copy its .bashrc and .profile into the new account. We can then compile CUDA program using nvcc. But when we run the CUDA program, it is seg fault – “unhandled level 3 permission fault (11)”:

Turns out all the GPU device files under /dev (/dev/nvhost-*) belong to group “video”, and id on “nvidia” shows this group as well. Adding the new user into “video” group (sudo usermod -aG video newuser) solves this permission issue.
References:
[1] https://devtalk.nvidia.com/default/topic/1023680/jetson-tx2/dhcp-not-working-and-no-internet-connection-from-tx2-after-installing-/1
[2] https://devtalk.nvidia.com/default/topic/1009267/jetson-tx2/mount-sd-card-into-jetson/
[3] https://devblogs.nvidia.com/even-easier-introduction-cuda/
[4] https://developer.nvidia.com/embedded/jetpack