Syzkaller [1] starts to support USB fuzzing recently and has already found over 80 bugs within the Linux kernel [2]. Almost every fuzzing expert whom I talked to has started to apply their fuzzing techniques to USB because of the high-security impact and potential volume of vulnerabilities due to the complexity of USB itself. While this post is NOT about fuzzing or USB security in general, I hope to provide some insights for USB fuzzing in general as someone who has been doing research on USB security for a while. Happy fuzzing!
1. Understand USB Stacks
USB is split into two worlds due to the master-slave nature of the protocol: USB host and USB device/gadget. When we talk about USB, it usually refers to the USB host, e.g., a laptop with a standard USB port. The figure below is the Linux USB host stack. From bottom to up, we have the hardware, kernel space, and user space.

From the Syzkaller USB fuzzing slides by Andrey Konovalov [3].
The USB host controller device (aka, HCD) is a PCI device attached to the system PCI bus and provides USB connection supports via USB ports. Depending on the generation of the USB technology, it is also called UHCI/OHCI for USB 1.x, EHCI for USB 2.x, and XHCI for USB 3.x controllers. For kernel to use this controller, we need a USB host controller driver, which sets up the PCI configuration and DMAs. Above it is the USB core, implementing the underlying USB protocol stack (e.g., Chapter 9) and abstracting ways to send/recv USB packets with generic kernel APIs (submit/recv URB). Above it are different USB device drivers, such as USB HID drivers and USB mass storage drivers. These drivers implement different USB class protocols (e.g., HID, Mass Storage), provide glue layers with other subsystems within the kernel (e.g., input and block), facilitate user spaces (e.g., creating /dev node).
Since Linux is also widely used in embedded systems, e.g., some USB dongles, USB device/gadget refers to both the USB dongle hardware and the USB mode within Linux. “Surprisingly”, it is totally different from the USB host mode. The figure down below demonstrates the USB gadget stack within the Linux kernel.

From the Syzkaller USB fuzzing slides by Andrey Konovalov [3].
At the bottom, we have the USB device controller (aka, UDC). Like HCDs, UDCs also implement specific version of the USB standards within the PHY layer. However, unlike the most common HCDs made by Intel, UDC IPs are found from different hardware vendors [8], such as DWC2/3, OMAP, TUSB, and FUSB. These controllers usually have their own design specifications, and might follow the HCD specification (e.g., XHCI specification) as well when they support USB On-The-Go (aka, OTG) mode. OTG allows a UDC to switch between USB host and USB device/gadget modes. For example, when an Android device connects with a laptop as MTP, the Android USB device controller is in the USB device/gadget mode. If a USB flash drive is plugged into an Android device, the UDC works in the USB host mode. A UDC supporting OTG is also replaced by a Dual-Role Device (DRD) controller in USB 3.x standards [11]. As a result, an OTG cable is not needed to switch the role of the UDC, since the role switching is done in software for a DRD controller.
To use a UDC, you need a UDC driver within the kernel, providing connection and configuration over industry-standard buses including both the AMBA™ AHB and AXI interfaces, and setting up DMAs for the higher layer. Like the USB core within USB host stack, the USB gadget core within USB gadget stack provides APIs to register and implement a USB gadget function via callbacks and configfs. For instance, we can pass USB descriptors to the USB gadget core and achieve a typical USB mass storage device by requesting the existing mass storage function (f_mass_storage). For more complicated protocols such as MTP, a user-space daemon or library provides the protocol logic and communicates with the gadget function via e.g., configfs or usbfs.
2. Where We Are
USB fuzzing started to attract more attention thanks to the FaceDancer [4], a programmable USB hardware fuzzer. It supports both USB host and device/gadget mode emulation and allows sending out pre-formed or mal-formed USB requests and response. Umap/Umap2 [5] provides a fuzzing framework written in Python with the different USB device and response templates for the FaceDancer. The TTWE framework [9] enables MitM between a USB host and a USB device by using 2 FaceDancers emulating the USB host and device/gadget, respectively. This MitM allows USB packet mutations for both directions, thus enables fuzzing on both sides.
All these solutions focus on the USB host stack due to the facts that people assume a malicious USB device rather than a malicious USB host, e.g., a laptop, and that most USB device firmware is closed source and thus hard to analyze. Accordingly, most of the bugs/vulnerabilities are found within the USB core (for parsing USB response) and some common USB drivers (e.g., keyboard). The pros of these solutions are their ability to faithfully emulate a USB device. However, the problems, in my opinions, are:
a. Hardware dependency.
b. Limited feedback from the target.
FaceDancer is slow, which makes any solution built upon it not scale. The fact that we need both a FaceDancer and a target machine as the minimum to start fuzzing also imposes more challenges for scalability. Feedback is the other big issue here. Mutations of the fuzzing input are based on templates and randomizations without real-time feedback from the target (e.g., code coverage) except system logging. Thus, fuzzing efficiency is questionable. As a result, these solutions are “best-effort” to find some bugs with a minimum setup effort.
To get rid of the hardware dependency, virtualization (e.g., QEMU) comes to save. vUSBf [6] uses QEMU/KVM to run a kernel image and leverages the USB redirection protocol within QEMU to redirect the access to USB devices to a USB emulator controlled by the fuzzer, as shown below:
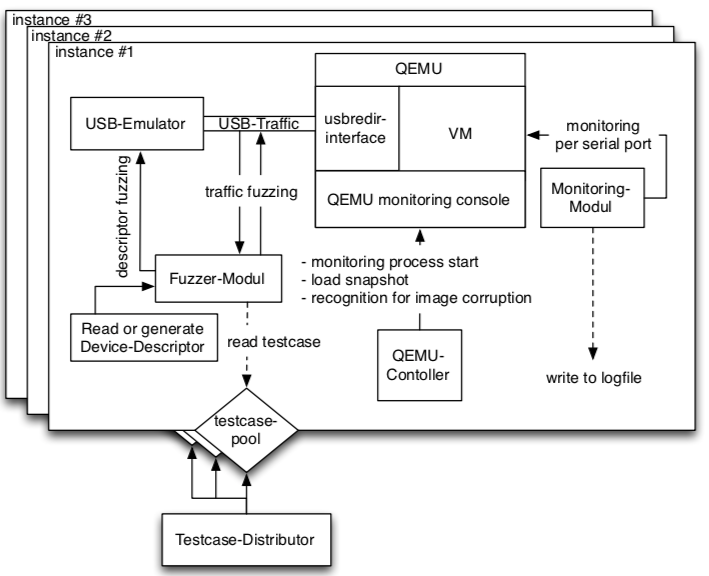
From the vUSBf paper [6].
While vUSBf provides a nice orchestration architecture to run multiple QEMU instances in parallel solve scalability issues, the fuzzer itself is essentially based on templates (or test cases according to the paper. The feedback still relies on system logging. POTUS [7] moves a step forward to leverage symbolic execution, e.g., S2E, to inject faults from the USB HCD layer, as shown below:
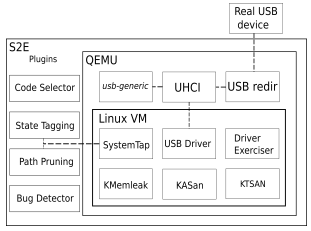
From the POTUS paper [7].
SystemTap is used to instrument the kernel to inject fault and annotations to save the number of faults. A path prioritization algorithm based on the number of faults within different states is used to control the number of “forks”. The number of faults of a given path represents the code coverage. Thus, a significant number of faults represents a high code coverage. POTUS also implements a generic USB virtual device within QEMU to emulate different USB devices using configurable device descriptors and data transfer. The Driver Exerciser within the VM uses syscalls to play with different device node exposed to the VM. Comparing to vUSBf, POTUS includes a fuzzing feedback mechanism (by counting the number of faults within a path) and support more USB device emulations. However, the manual effort to emulate operations on certain USB devices within the Driver Exerciser, fundamental limitations of symbolic executions – path explosion, and the unknown effectiveness and limitations of relying on the number of faults of a path for path scheduling, make POTUS hard to evaluate in the real world.
Syzkaller [1] USB fuzzing support [12] was added recently by Andrey Konovalov at Google., and has demonstrated its ability to find more bugs. Andrey solved two main problems of using Syzkaller to fuzz USB:
a. Code coverage for kernel tasks.
b. Device emulation within the same kernel image.
Since USB events and operations happen within IRQ or kernel context rather than a process context (e.g., USB plugging detection within khub kernel task in older kernels), syscall-based tracing and code coverage [10] simply won’t work. We need the ability to report the code coverage anywhere within the kernel. To do that, we need to annotate the USB-related kernel source (e.g., hub.c) with the extended KCOV kernel APIs to report the code coverage [13]. Instead of relying on QEMU, Syzkaller uses the gadgetfs to expose a fuzzer kernel driver to the user space [14], which can then manipulate the input for fuzzing. By enabling both the USB host stack and the USB gadget stack in the kernel configuration and connecting them using the dummy HCD and UDC drivers together as shown below, Syakaller is able to fuzz USB host device drivers, such as USB HID, Mass Storage, etc., from the user-space fuzzing the USB fuzzer kernel driver.
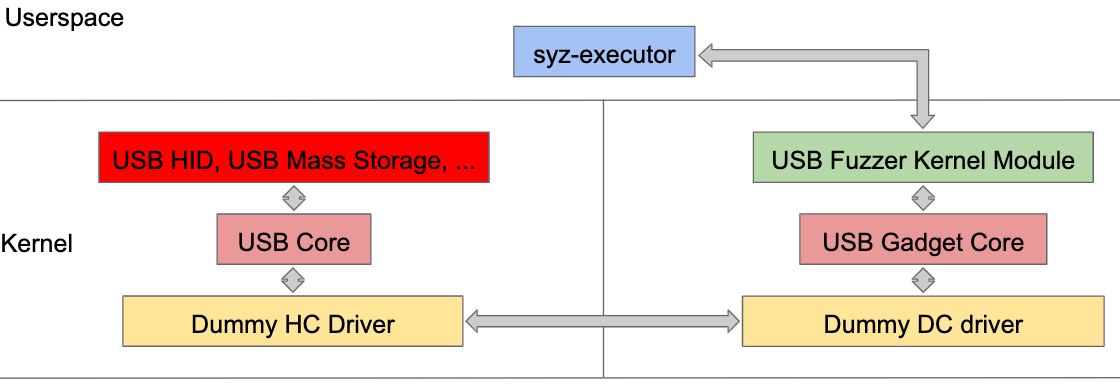
From the Syzkaller USB fuzzing slides by Andrey Konovalov [3].
Syzkaller USB fuzzer might be the first real coverage-based USB host device driver fuzzer thanks to the existing Syzkaller infrastructure and nice hackings to bridge the USB host and gadget the same time. While it has found tons of bugs and vulnerabilities, the limitation of the fuzzer starts to reveal – most of the issues found were in the initialization phase of a driver (e.g., probing). In the user space, the fuzzer is able to configure the fuzzer kernel driver to represent any USB device/gadget by exploring different VID/PID combinations within the USB device descriptor. On the one hand, Syzkaller is able to trigger almost every USB host device driver to be loaded, thus having a prominent code coverage horizontally. On the other hand, since no real emulation code for a certain device is provided within the user-space fuzzer or the fuzzer kernel driver, most fuzzing stops after the initialization of a driver, thus covering only a small portion of the driver vertically.
3. What To Be Done
Cautions readers might have found it already – all these fuzzing solutions focus on the USB host stack, especially on the USB host device drivers. Again, this is due to the facts that people often refer USB to the USB host stack, and that these device drivers are famous for containing more vulnerabilities than other components within the kernel (e.g., device drivers on Windows). However, at this point, I believe you have realized that what has been covered on USB fuzzing so far is the tip of the iceberg, either horizontally or vertically. Let’s enumerate what to be done next.
a. HCD drivers fuzzing
If we limit ourselves within the USB host stack, it is interesting to find HCD drivers are ignored. Unlike device drivers, they are not accessible from the user space via syscall (except tunning some parameters using sysfs). Instead, they receive inputs from the USB core (e.g., usb_submit_urb) in the upper layer (internal) and DMAs of the HCD layer (external). From a security perspective, external inputs should impose more threats than the internal ones.
To directly fuzz the internal inputs of HCD drivers, we need the ability to mutates the parameters of kernel APIs exposed to the USB core and get the code coverage from the HCD driver. To directly fuzz the external inputs of HCD drivers, we need to mutate on DMA buffers and event queues, as well as the code coverage from the HCD driver. Note that the code coverage is often different in these two cases because of different code paths for TX and RX. Thus we need a fine-granularity code coverage reporting to reflect this. Mutating on DMA buffers and event queues is essentially building an HCD emulator with fuzzing capabilities. For common HCD drivers such as Intel XHCI, QEMU provides the corresponding HCD emulation already (e.g., qemu/hw/usb/hcd-xhci.c), and one can try to add fuzzing functionality there. For other HCD drivers that QEMU does not provide the HCD emulation, one needs to build the HCD emulation from scratch.
b. USB device/gadget stack fuzzing
Yes, we do not have systematic fuzzing on the USB device/gadget stack. It used to be OK since we often assume a malicious USB device rather than a malicious host. However, the broad adoption of USB OTG and DRD controllers in embedded systems (e.g., Android devices) extends the threat model to include USB host as well. For example, no one wants their phones to be hacked during USB charging. Architecturally, Syzkaller USB fuzzer has imagined a way to fuzz the USB device/gadget stack, as shown below.

From the Syzkaller USB fuzzing slides by Andrey Konovalov [3].
Instead of having the user-space fuzzer communicating with the USB fuzzer kernel driver, another user-space fuzzer will manipulate USB host device drivers. The fuzzer activities will be propagated via the USB host stack to the USB device/gadget stack, hopefully. Accordingly, we need to configure the kernel to enable all different gadget functions within the same kernel image, as well as code coverage reporting. We are then able to fuzz the USB gadget core and USB gadget function drivers, except UDC drivers.
Note that Syzkaller imagines one way to fuzz the USB device/gadget stack, a natural result due to the architecture and limitations of Syzkaller. Syzkaller is a syscall fuzzer, meaning that the input mutations happen from syscall parameters. But this does not mean we have to fuzz at the syscall layer (e.g., user-space). If we look at the figure above again, we can find a long path from the fuzzer to the fuzzing target (e.g., USB host device drivers or USB device/gadget drivers). How could we know if all the fuzzing inputs are successfully propagated to the target instead of being filtered by middle layers in between? One core question is if syscall-based fuzzing is suitable for USB fuzzing within the kernel. Again, the Syzkaller USB fuzzer accommodates itself to the constraints of the Syzkaller itself instead of thinking about building a USB fuzzer (e.g., the USB host or gadget stacks) from scratch.
To shorten the fuzzing path is to push the fuzzer (inputs) close to the target. For example, we could get rid of the whole USB host stack by building a USB UDC emulator/fuzzer within QEMU, directly enabling UDC driver fuzzing. However, this does not mean any DMA write can be translated into a valid USB request to the USB gadget drivers in the upper layer. As a result, the fuzzing path is indeed shorter, but we still hope that the mutation algorithm and the code coverage granularity will save us. In the end, we might need different fuzzers for different layers within the stack, making sure all fuzzing inputs applied to the target without being filtered. E.g., we may need to build a USB host emulator/fuzzer sending out USB requests to different USB gadget drivers directly.
c. Android USB fuzzing
Android might be the heaviest USB device/gadget stack user via maintaining its own branch of the kernel and implementing extra USB gadget function drivers (e.g., MTP). The OTG/DRD support within Android devices also doubles the attacking surface comparing to a typical USB host machine. The fundamental challenge is to run an Android kernel image with the corresponding UDC/DRD drivers used by real-world Android devices using QEMU. Running non-AOSP kernels in QEMU imposes extra difficulties due to SoC customizations and variations. That’s why a lot of Android fuzzing still requires a physical device.
d. Protocol-guided/Stateful fuzzing
In section b, we talked about why we might wanna shorten the fuzzing path because we wanna avoid fuzzing inputs being filtered before hitting the target. Turns out it is much more complicated here. If we look at the figure above on USB device/gadget fuzzing imagined in Syzkaller again, the fuzzer inputs start with syscalls, pass different USB host device drivers before finally delivered to the USB gadget stack. Yes, the fuzzing path is long, and the fuzzing input could be filtered along the way. Meanwhile, these extra layers in between guarantee that whatever fuzzing inputs sent out is legitimate USB request carrying the corresponding protocol payload triggered by the right driver state. For example, the final USB request generated by the fuzzer via the USB mass storage driver might contain a legitimate SCSI command (e.g., read) triggered by the core logic of the USB host device driver rather than the initialization part.
This is what I call the “protocol-guided/stateful” fuzzing. As you can tell, it is essential to go “deeper” vertically within a layer, e.g., exploring other parts of a kernel driver beyond the initialization/probing phase. Simply put, to fuzz either USB host or device/gadget drivers, we need to establish a virtual connection with the target (e.g., making sure the kernel driver initialized and ready to process inputs) – stateful, and teach the fuzzer to learn the structure of the input (e.g., SCSI protocol in USB Mass Storage) – protocol-guided. In the end, it is a trade-off between including other layers to reuse the existing protocol and state controls thus increasing the fuzzing path and complexity and implementing a light-weight protocol-aware/stateful fuzzing within the fuzzer directly to reduce the fuzzing path. Both have their pros and cons.
e. Type-C/USBIP/WUSB fuzzing
There are more things in USB other than the USB host and USB device/gadget, including USB Type-C, USBIP, WUSB, etc. While we could reuse some of the lessons learns in USB fuzzing, these technologies introduce different software stacks and may require different attentions to solve their quirks.
4. Summary
This post looks into USB fuzzing, a recent hot topic from both software security and operating system security. Instead of treating USB as another piece of software, we start with understanding what USB stacks are and why USB refers to a bigger picture than what people often imagined. We survey some previous works on USB fuzzing, from using specialized hardware to running QEMU. We conclude with what is missing and foresee the future.
P.S. This blog post was long overdue. I promised to have it a month ago but never made it. I also underestimated how much time needed to finish it. A lesson learns (again, for myself) is to start early and focus. Anyway, better delay than nothing:)
References:
[1] https://github.com/google/syzkaller
[2] https://github.com/google/syzkaller/blob/e90d7ed8d240b182d65b1796563d887a4f9dc2f6/docs/linux/found_bugs_usb.md
[3] https://docs.google.com/presentation/d/1z-giB9kom17Lk21YEjmceiNUVYeI6yIaG5_gZ3vKC-M/edit?usp=sharing
[4] http://goodfet.sourceforge.net/hardware/facedancer21/
[5] https://github.com/nccgroup/umap2
[6] https://github.com/schumilo/vUSBf
[7] https://www.usenix.org/conference/woot17/workshop-program/presentation/patrick-evans
[8] https://elinux.org/Tims_USB_Notes
[9] https://www.usenix.org/conference/woot14/workshop-program/presentation/van-tonder
[10] https://davejingtian.org/2017/06/01/understanding-kcov-play-with-fsanitize-coveragetrace-pc-from-the-user-space/
[11] https://blogs.synopsys.com/tousbornottousb/2018/05/03/usb-dual-role-replaces-usb-on-the-go/
[12] https://github.com/google/syzkaller/commit/e90d7ed8d240b182d65b1796563d887a4f9dc2f6
[13] https://github.com/xairy/linux/commit/ff543afbf78902acea566fa4c635240ede651f77
[14] https://github.com/xairy/linux/commit/700fb65580efc049133628e7b9f65453bb686231